|
Frankie's Cannon
Frankie is our Cocker Spaniel, he loves to have a job. Frankie LOVES to Play and Fetch! He is not an overly Hyper Dog. He has very good House Manners, but if the situation arises to "do something", he is always ready. Frankie is trained to do all sorts of things and loves the opportunity to show off his talents. So, when I saw, live, the Dock Dogs competition where the dogs were jumping off a dock into a swimming pool after a long throw of a floating toy, I thought he might enjoy the sport. Soooooo. Training has begun.
I have wanted a Retriever Dummy Launcher for many years. I used to own and train Labrador Retrievers. They could Fetch all day. Land or water, they had a great time. Deron had this great idea for my Fetching Frankie. What if he built him a PVC air blaster Cannon? What if it had a foot peddle so that Frankie could learn to set it off himself? Well, it sounded like a great idea to me! So we bought Frankie a 2" diameter Orange Training Retrieving Dummy and Deron bought the parts to put the Cannon together.
Here is how we built ours. Remember you are dealing with a Cannon that propels an item. It is not a toy and not an item that your would send your pet and child out alone to use. We can not and will not be held responsible for how you build, set up or use your Cannon. After all, we can not see how you are building it or putting it together, or how well you have trained your dog. We have no idea where you plan to shoot the Cannon or if you are putting the right type of items into the Barrel for Launching. PLEASE keep safety first and above all else!
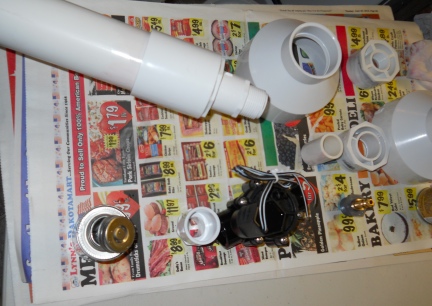
What parts Deron used for Frankie's Cannon: (of course you could vary the size and how you put your dog's Cannon together)
1 - 4' of 4" Sch40 PVC
1 - 5' of 2" Sch40 PVC
1 - 2" Straight PVC Coupler
2 - 2" to 1" PVC Flange
2 - 2" length of 1" PVC Pipe
2 - 1" Female to 1" Male Threaded PVC Adapter
1 - 1" Inline Valve (electric activated valve)
2 - 4" to 2" Reducers PVC Pieces
1 - 2" to 3/4" Threaded PVC Flange
1 - 3/4" to 1/4" Threaded both ends PVC Flange
1 - 1/4" Metal Nipple (air hose attachment part)
PVC Primer
PVC Glue
Plumber's Teflon Tape
12 Volt Battery
Air Source (Air Compressor, Bike Tire Pump)
Tools Needed:
Saw
Wipes to clean PVC and any parts that might need to be wiped down before attaching
Frankie's Ammo:
3 - 2" Fabric Retrieving Dummies (Frankie's are orange). If you do not know what these are, look in the Hunting Dog section of your Pet Store or Pet Dept. Ask the sales people for help if you still can not find them on your own. We used 2", Frankie is a Cocker Spaniel. You might want to use a larger size (be sure to use a larger Cannon Barrel if you chose a larger diameter Dummy) for a larger breed of dog. Be sure to use Fabric because the plastic type have the nobs that will allow the air that shoots your Cannon to escape around the Dummy.
Assembling Frankie's Cannon or How To Put Your Dog's Cannon Together
If your PVC Pipe is longer than needed, cut to length. Sand any rough edges on each of your PVC parts. Clean each of your parts with PVC Primer. As you put your pieces together use the PVC Glue and apply to the male and female contact surfaces of the joints.
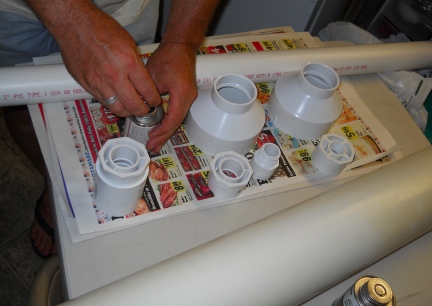 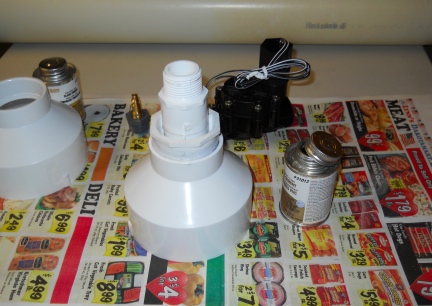  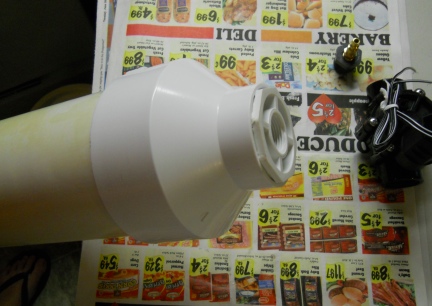
Start with your 2" Coupler and 2" to 1" Flange. Glue together. Let set for approx 30 seconds before moving (do this for each of the glued joints you put together). The 2" length of 1" PVC Pipe glues into the 1" hole of the 2" to 1" Flange that you just glued to the 2" Coupler. Again, let set for 30 seconds. Add your 1" to 1" Threaded PVC Pipe glued to the 2" length at the 1" end. This new assembly will be glued to your 2" barrel. This is easier then starting at the barrel end and working the other direction. Set this assembly aside to dry. This is your complete Barrel Assembly that will screw into your Valve. Next, the 4" to 2" reducer is glued to the 2" to 1" Flange, of course at the 2" end. Add your 2" length of 1" PVC Pipe to this. Glue another 1" to 1" Threaded piece, but not the threaded side, to that end. Glue this assembly to your 4" PVC Air Chamber. Let dry. Glue your 4" to 2" reducer to your 2" to 3/4" threaded Flange. This gets glued to the other end of your 4" Air Chamber. Let all pieces dry overnight.
Using Plumber's Teflon Tape, wrap the threads of your barrel, once around. Thread that piece into the outgoing end of your Inline Valve. Also wrap the threads on the Pressure Tank end of your Cannon, and attach to the opposite end of your Inline Valve. Take your 3/4" to 1/4" PVC Flange, tape the threads, once around, attach this piece to far end or still open end of your 4" PVC Pipe, or what we are calling the Air Tank. Finally, using your Plumber's Teflon Tape, wrap the threads of your 1/4" Metal Nipple and attach this piece to the 1/4" PVC Flange.
First Shot Out Of The Cannon
We highly recommend, and this is what we practice here. Fill your Air Chamber, very carefully and back away as much as you can be. Have all spectators stand well back and preferably behind shelter. Test fire your Cannon without your dog ready to fetch. This is your safety check shot.
After that first shot you can then begin using your Cannon to send Training Dummies out for your dog to fetch. Take your time and train your dog correctly. If your do is first afraid of the noise the Cannon makes, do not baby the dog, reassure it and move your dog training to fetch the Dummy further away from the Cannon until the dog is used to the sound. The sound is nothing like a gun going off and not too loud that it bothers your ears. Just different.
Training Your Dog To Use The Cannon
I will assume your dog already Fetches items and I will assume you have already taught your dog to Fetch the Training Dummy by throwing it for the dog to retrieve. We do not leave training equipment with our dogs. So the Training Dummies that we have are put up after Frankie retrieves them. (Frankie has other toys to play with) We taught Frankie to retrieve the Training Dummy by throwing them, then, and you would have to know my husband to really appreciate this, Deron put the Dummy into the 2" PVC Pipe (doing this in the house before he assembled the Cannon) and used his breath to blow the Dummy across the room for Frankie to fetch. This taught Frankie that the Dummy will be coming out of the tube and he should watch for it.
When we took Frankie out with his Cannon the first few times we made sure that he saw the Dummy being loaded into the Barrel of the Cannon. Then we used the word, "Watch It". This getting him to watch to Cannon Barrel to see when the item was shot out. He is not a stupid dog and the noise gave him a bigger hint. Frankie was on a "Sit Wait" over by me, not in the line of fire, while Deron set off the Cannon.
As the Training Dummy came shooting out of the Barrel I gave the command "Get It!" so that Frankie would know to "Fetch It Up". If and when Frankie did not see the Dummy, and was sent for a "blind fetch" I used the command "Fetch It Up". A Blind Fetch is when you send your dog off for a Fetch of something they did not see land, meaning they will have to scent it, either or with both, smell and site. If you walk up with your dog on a Blind Fetch, you can also use your arm and finger to point to the item. Swing your arm up from your side, fingers straight out, and point to the item, telling the dog, "Fetch It Up".
more to come
How Far Will It Shoot?
A lot depends on how well you built your Cannon. First out, Frankie's Cannon shot the Training Dummy 128'. We know because Deron, with Frankie at his side measured with a Walking Wheel. How far Frankie's Cannon will shoot also depends on the angle you have it set at. By aiming up about degrees your Dummy will fly further. The amount of air pressure in the cannon take will also determine how far your Dummy will go.
Deron used an Air Compressor in our Pressure Tank. It is easy to use and fast to fill.
Storing Your Dog's Cannon
If you put together a Dog Training Cannon, you now own an item that should not be left outdoors or in an area where others, especially children and drunks, could help themselves to using it. Your Dog's Cannon should be kept indoors to keep it clean and dry and out of the sun so that the UV rays do not destroy it. You probably do not want Your Dog's Cannon rained on, or beat with hail, or left out in the winter so that it becomes covered with snow. If you have a storage area that locks, this would be your best option. You will be responsible for and of any use of this Cannon, using it yourself or even when others are allowed to shoot it. Think twice before lending this item out.
DON'T BE STUPID AND LET SOMEONE GET HURT!
ALWAYS BE SURE YOU ARE SHOOTING IN A OPEN AREA, NOT NEAR HOMES OR TREES, OR VEHICLES OR THE LIKE. THERE SHOULD BE NO PEOPLE OR ANIMALS OUT IN THE AREA YOU ARE AIMING/SHOOTING INTO. MAKE SURE IT IS A SAFE AREA FOR YOUR DOG TO RUN OUT INTO TO FETCH IT'S TRAINING DUMMY.
Remember you are dealing with a Cannon that propels an item. It is not a toy and not an item that your would send your pet and child out alone to use. We can not and will not be held responsible for how you build, set up or use your Cannon. After all, we can not see how you are building it or putting it together, or how well you have trained your dog. We have no idea where you plan to shoot the Cannon or if you are putting the right type of items into the Barrel for Launching. PLEASE keep safety first and above all else!
I would like to invite you to join us on a Yahoo Group that I host called Working Big Dogs. WE ALSO SET UP AN ELIST FOR BARREL RACING DOGS CHIT CHAT - PLEASE COME JOIN US
The contents of this page for Frankie's Cannon is still under construction. Please check back later!
-- The Barrel Racing Dogs Team
Sat, 30 Jun 2012 15:50:24 -0400
| 


 In the high plains of South Dakota, USA